have been playing around with writing Canon R5C to HDMI capture using swift as a CLI on Mac instead of using ffmpeg, and struggled figuring out why my camera capture code was not running
note to self: enable camera permissions for the CLI

#!/bin/zsh
set -euo pipefail

DEVICE_NAME="Cam Link 4K"

STILL_MODE=0
VR180_MODE=0

# --- args ---
for arg in "$@"; do
  case "$arg" in
    -still) STILL_MODE=1 ;;
    -vr180) VR180_MODE=1 ;;
    *) ;;
  esac
done

# --- Color correction (Canon Log 3 -> display) ---
# Put your .cube somewhere stable; choose one that matches your camera gamut setting
LUT_PATH="$HOME/canon-test-jan-17-2026/CanonLog3_to_Canon709.cube"

# tetrahedral looks best; trilinear is faster if you need it
CC_VF="lut3d=file='${LUT_PATH}':interp=tetrahedral"
# Tag output for players (metadata only)
TAG709_VF="setparams=color_primaries=bt709:color_trc=bt709:colorspace=bt709:range=tv"


get_avfoundation_video_index() {
  local name="$1"
  local out

  out="$(ffmpeg -hide_banner -f avfoundation -list_devices true -i "" 2>&1 || true)"

  printf '%s\n' "$out" | awk -v name="$name" '
    /AVFoundation video devices:/ {in_video=1; next}
    /AVFoundation audio devices:/ {in_video=0}
    in_video && index($0, name) {
      if (match($0, /\[[0-9]+\]/)) {
        s = substr($0, RSTART, RLENGTH)
        gsub(/[^0-9]/, "", s)
        print s
        exit
      }
    }
  '
}

idx="$(get_avfoundation_video_index "$DEVICE_NAME")"

if [[ -z "$idx" ]]; then
  print -u2 "Error: could not find avfoundation video device named '$DEVICE_NAME'."
  print -u2 "Video devices seen:"
  ffmpeg -hide_banner -f avfoundation -list_devices true -i "" 2>&1 \
    | sed -n '/AVFoundation video devices:/,/AVFoundation audio devices:/p' >&2 || true
  exit 1
fi

input="${idx}:none"
print -u2 "Using '$DEVICE_NAME' at video index ${idx} (ffmpeg -i \"$input\")"

mkdir -p hls_raw

# Capture settings (request a device-supported pixel format)
INPUT_FPS=30
INPUT_SIZE="3840x2160"
INPUT_PIXFMT="nv12"   # supported by avfoundation for many devices, avoids yuv420p override warnings

# Your UI-trim crop (y=70, remove 130px total from 2160 -> 2030)
RAW_CROP_VF='crop=in_w:in_h-130:0:70'

# VR180 prep crop: force 2:1 so each eye becomes square (3840x2160 -> 3840x1920)
# This makes v360 happier for fisheye mapping.
VR_SQUARE_CROP_VF='crop=in_w:in_w/2:0:(in_h-in_w/2)/2'

# v360 mapping settings
VR_FOV=190         # try 180–200; adjust by eyeballing
VR_YAW=0
VR_PITCH=0
VR_ROLL=0

# If your stereo looks "inside-out", you may need to swap eyes:
# SWAP_EYES_VF='stereo3d=sbsr:sbsl,'
SWAP_EYES_VF=''

# High-res VR180 filterchain (nice for stills)
VR180_VF="${VR_SQUARE_CROP_VF},${SWAP_EYES_VF}v360=input=fisheye:output=hequirect:in_stereo=sbs:out_stereo=sbs:w=3840:h=3840:ih_fov=${VR_FOV}:iv_fov=${VR_FOV}:yaw=${VR_YAW}:pitch=${VR_PITCH}:roll=${VR_ROLL},setsar=1"

# Streaming VR180 filterchain:
# Use a smaller per-eye size so SBS total width stays in a VideoToolbox-friendly range.
# Also force format=nv12 at the end for the encoder.
VR180_STREAM_VF="${VR_SQUARE_CROP_VF},${SWAP_EYES_VF}v360=input=fisheye:output=hequirect:in_stereo=sbs:out_stereo=sbs:w=2048:h=2048:ih_fov=${VR_FOV}:iv_fov=${VR_FOV}:yaw=${VR_YAW}:pitch=${VR_PITCH}:roll=${VR_ROLL},setsar=1,${CC_VF},${TAG709_VF},format=${INPUT_PIXFMT}"

if (( STILL_MODE )); then
  print -u2 "STILL mode: writing single frame to hls_raw/snapshot.jpg"

  ffmpeg \
    -f avfoundation -thread_queue_size 1024 \
    -framerate "${INPUT_FPS}" -video_size "${INPUT_SIZE}" -pixel_format "${INPUT_PIXFMT}" \
    -use_wallclock_as_timestamps 1 -i "$input" \
    -vf "$RAW_CROP_VF" \
    -frames:v 1 -q:v 2 -y \
    hls_raw/snapshot.jpg

  if (( VR180_MODE )); then
    print -u2 "STILL + VR180 mode: writing VR180 half-equirect SBS to hls_raw/snapshot_vr180.jpg"

    ffmpeg \
      -f avfoundation -thread_queue_size 1024 \
      -framerate "${INPUT_FPS}" -video_size "${INPUT_SIZE}" -pixel_format "${INPUT_PIXFMT}" \
      -use_wallclock_as_timestamps 1 -i "$input" \
      -vf "$VR180_VF" \
      -frames:v 1 -q:v 2 -y \
      hls_raw/snapshot_vr180.jpg
  fi

  exit 0
fi

if (( VR180_MODE )); then
  print -u2 "VR180 streaming mode: writing HLS to hls_raw/vr180.m3u8"
  print -u2 "To watch locally:  (cd hls_raw && python3 -m http.server 8000)  then open http://localhost:8000/vr180.m3u8"

  ffmpeg \
    -f avfoundation -thread_queue_size 1024 \
    -framerate "${INPUT_FPS}" -video_size "${INPUT_SIZE}" -pixel_format "${INPUT_PIXFMT}" \
    -use_wallclock_as_timestamps 1 -i "$input" \
    -vf "$VR180_STREAM_VF" \
    -fps_mode cfr -r "${INPUT_FPS}" \
    -c:v h264_videotoolbox -allow_sw 1 \
    -b:v 30M -maxrate 30M -bufsize 60M \
    -g 30 \
    -force_key_frames "expr:gte(t,n_forced*1)" \
    -f hls -hls_time 1 -hls_list_size 6 \
    -hls_flags delete_segments+append_list+omit_endlist+independent_segments \
    -hls_segment_filename "hls_raw/vr180_seg%03d.ts" \
    hls_raw/vr180.m3u8

  exit 0
fi

# Default: original streaming (but use the same RAW crop as -still so they match)
print -u2 "Streaming mode: writing HLS to hls_raw/stream.m3u8"
print -u2 "To watch locally:  (cd hls_raw && python3 -m http.server 8000)  then open http://localhost:8000/stream.m3u8"

ffmpeg \
  -f avfoundation -thread_queue_size 1024 \
  -framerate "${INPUT_FPS}" -video_size "${INPUT_SIZE}" -pixel_format "${INPUT_PIXFMT}" \
  -use_wallclock_as_timestamps 1 -i "$input" \
  -vf "$RAW_CROP_VF,$CC_VF,$TAG709_VF,format=${INPUT_PIXFMT}" \
  -fps_mode cfr -r "${INPUT_FPS}" \
  -c:v h264_videotoolbox -allow_sw 1 \
  -b:v 16M -maxrate 16M -bufsize 32M \
  -g 30 \
  -force_key_frames "expr:gte(t,n_forced*1)" \
  -f hls -hls_time 1 -hls_list_size 6 \
  -hls_flags delete_segments+append_list+omit_endlist+independent_segments \
  -hls_segment_filename "hls_raw/seg%03d.ts" \
  hls_raw/stream.m3u8
heres a script that you run with chmod +x record-stream.sh and then ./record-stream.sh -vr180 and it should write to hls_raw/vr180.m3u8 folder which you should be able to then run a python server python3 -m http.server 8080 --directory hls_raw
and then from there you can get a side by side projection live from the HDMI cable
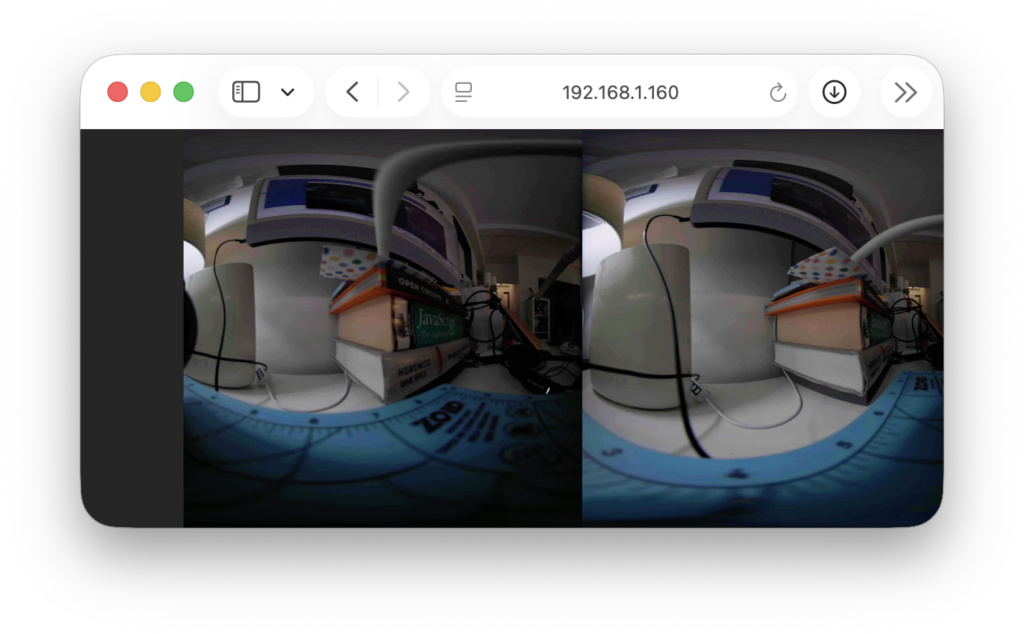
take a look at the script, theres a way to get jpeg and a way to see the actual HDMI capture from a canon r5c raw
The camera itself is switched to the display mode where if you press the Display 3(INFO) button, it toggles through the view, its the one where theres no UI except the STBY / REC label at the top, and then the

all with ffmpeg!
the next step in this process is to convert it to a swift app, but has to be investigated if the ffmpeg stream can be loaded into Moon Player or something that can take the ffmpeg stream of side by side and then
oh right another note to self: when ffmpeg is running to quit it enter “q” otherwise you might ghost it or it might not want to stop entering “q” is the quickest way to get the ffmpeg to knock it off and shutdown